
 EN
 AR
 DA
 NL
 FI
 FR
 DE
 EL
 HI
 IT
 JA
 KO
 NO
 PL
 PT
 RO
 RU
 ES
 SV
 TL
 IW
 ID
 SR
 VI
 HU
 TH
 TR
 FA
 MS
 IS
 AZ
 UR
 BN
 HA
 LO
 MR
 MN
 PA
 MY
 SD
IR Focus Shift: Why Day and Night Images Focus Differently
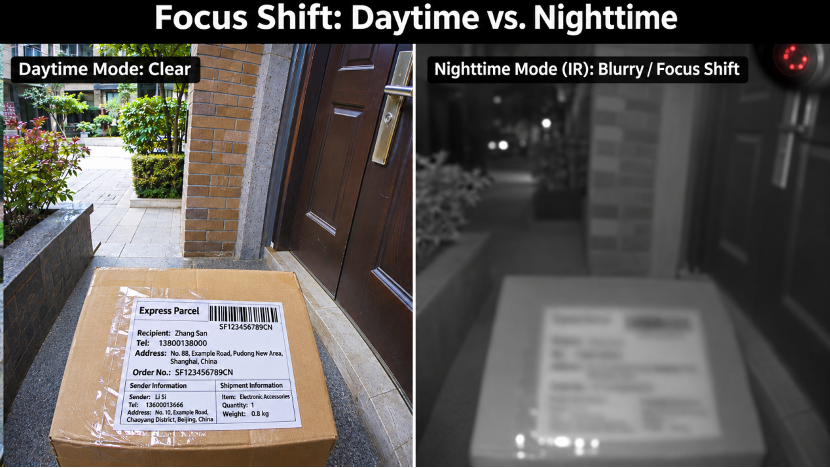
At noon, a camera mounted above an entrance can read the fine print on a shipping label. After dark, the label is still in the same spot. The infrared LEDs come on, the image switches to black and white, and the text goes soft. The package is easy enough to see, but the details that were readable during the day are now hard to make out.
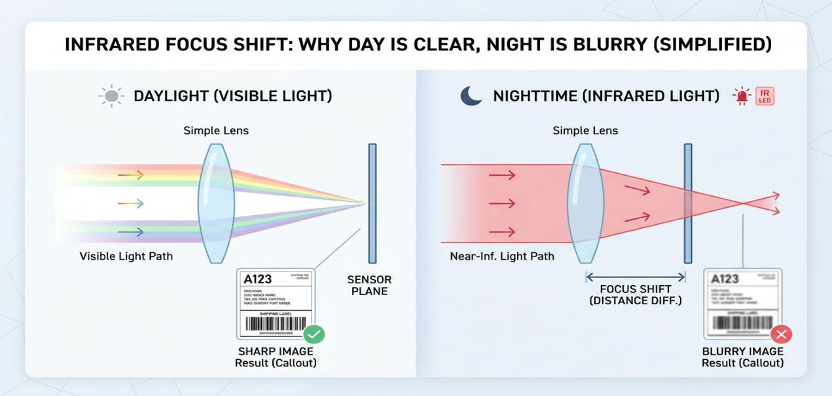
One possible cause is infrared focus shift. A lens can form a sharp image from visible light at the sensor while bringing near-infrared light to best focus at a slightly different plane. The sensor stays where it is, so the night image can look out of focus even though the camera has not moved. For a quick check, keep the same target still at the same distance. Capture one image under visible light and another under the infrared illumination you plan to use, then compare the results.
Why Can the Plane of Best Focus Shift After Dark?
A lens bends light to form an image on the sensor. How much the light bends depends on its wavelength and the optical materials in the lens. A lens design can bring several visible wavelengths to focus near the sensor plane. Even a lens that is well corrected across the visible spectrum still needs to be evaluated at 850 nm or 940 nm, two wavelengths commonly used for near-infrared illumination.
Imagine an installer adjusting the lens in daylight until the smallest text on a test card is readable. That setting gives a sharp image under visible light. At night, when most of the light reflected by the card comes from IR LEDs, the best focus position may change. If the shift is within the system’s tolerance, the text can still be sharp enough to read. If it exceeds that tolerance, the thinnest strokes are often the first details to disappear. For more on this distinction, see Axis’s discussion of conventional and IR-compensated lenses.
What Changes When a Camera Switches to Night Mode?
In a typical design with a switchable IR-cut filter, the filter reduces the amount of near-infrared light reaching the sensor during the day, which helps preserve natural color. In night mode, the filter moves out of the optical path so the sensor can capture near-infrared light reflected by the subject. The camera may also switch to monochrome and turn on its IR LEDs.
Each component has a different job.
- The LEDs illuminate the subject.
- The filter determines which wavelengths can reach the sensor.
- The lens determines how sharply those wavelengths are focused on the sensor.
If the image is already bright enough but the fine print still looks soft, more IR illumination may simply brighten the same blurry edges. In some designs, switching modes also changes which piece of glass sits in the optical path. Test sharpness in both positions with the actual filter assembly installed. Sinoseen’s guide to how IR-cut filters work
Three Checks Before You Blame the Lens
Check Whether a Stationary Target Looks Sharp
Use a test card printed with thin black lines, or use the smallest text the device actually needs to read. Secure it at the intended working distance and capture day and night images at the same output resolution.
- If the stationary card looks soft under infrared light and a small focus adjustment makes the fine lines sharp again, focus is worth investigating.
- If the stationary card stays sharp and only the moving package leaves a smear, check exposure time first. The camera may use a longer exposure per frame at night than it does during the day.
Look for Reflections and Loss of Contrast
A pale halo near the edge of the frame may come from infrared light reflecting off the inside of a clear cover. A washed-out patch in the middle of the image may be glare from a glossy label. If the test setup allows it, move the illuminator or temporarily remove the cover and capture another image. If the text becomes clear when the glare disappears, check the optical path and the mounting arrangement. In low light, stronger noise reduction can also smooth away fine texture. Save a few individual frames and compare the edges. The difference is easier to see in still images than in a live preview.
Test With the Illuminator the Device Will Ship With
A lens that looks sharp enough under an 850 nm lamp on the bench may behave differently in an enclosure fitted with a 940 nm LED. The lens may focus the two wavelengths differently, and the sensor response and the target’s image contrast may also change. Use the actual LEDs, drive-current settings, and enclosure window when you test. If the project uses both wavelengths, save a set of images for each. A result from one light source only describes performance under that source. Axis’s focus troubleshooting guide gives an example of a camera with separate focus settings for visible light, 850 nm, and 950 nm.
How to Keep Day and Night Images Sharp Enough
If the camera has to read fine print in both modes, ask whether the lens is corrected for visible light and the near-infrared wavelength you plan to use. An IR-compensated lens is designed to reduce the difference between the two focus positions. Ask which wavelengths were tested and how the lens performs at your working distance. A product labeled “night vision” is intended for that application. You still need to review the actual optical configuration and sample images to judge sharpness.
With a fixed-focus module, you can sometimes set the lens at a compromise position that meets the sharpness requirement in both modes. That may be enough for a camera that only needs to show an overview. Reading a small code at the far end of the scene usually leaves less room for focus error. Test the nearest and farthest positions the subject will occupy. If one setting cannot pass in both modes, consider an IR-compensated lens or a design that can refocus when the mode changes.
With a motorized focus lens, you can set different lens positions for day and night if the camera supports that function. Check how long it takes to produce a sharp image after switching. Even if the camera focuses correctly after two seconds, it could miss a label that passes through the frame immediately after the switch. If the device only captures on a trigger, include the mode transition in your test.
If you can adjust the lens on a test unit, mark the starting position and move the lens in small steps, capturing one frame at each position. Run the sequence once under visible light and once under infrared light. Compare the same fine lines in every frame. If the sharpest images occur at different lens positions, you can see the shift directly. Next, find the range of positions where the target is readable under both kinds of illumination. For setting a production lens, that overlap is more useful than the single sharpest position in either mode. Repeat the test on several units before setting a production tolerance.
A Sinoseen Module to Evaluate
The Sinoseen OV2710 IR-CUT USB camera module (XLS-PC222M-V1.0) is an option for fixed-focus day and night imaging. The product page lists a 2 MP OV2710 sensor, 1920 × 1080 resolution, a USB 2.0 interface, and a 3.6 mm lens with an M12 × 0.5 thread. It also describes color imaging during the day, monochrome imaging at night, and automatic LED switching.
If you are considering this module, confirm the LED wavelength, filter assembly, and lens performance under visible and near-infrared light for the sample you will receive. The product page does not give IR compensation test results or quantify focus shift for the standard lens. Mount the sample at the intended working distance, leave the lens position unchanged, and check whether the same target is readable in both modes.
What to Record When Testing a Sample
Start with a question the end user needs to answer from the image. For a camera inside a cabinet, that might be whether they can read the last four digits on a part label. Put the label where it will sit in the finished device and capture one visible-light image and one infrared image. Repeat the test at the farthest working distance and near a corner where the label could appear. Leave the enclosure window in place and record the exposure, gain, and focus settings if the camera makes them available.
Evaluate the saved image or the frame the software actually receives. If the live preview looks fine but thin strokes disappear in the recording, check whether recording or compression changed the image. Save a frame that passes the test in each mode. You can use those frames as a reference when you change the lens, filter, or LED.
If you are choosing a day/night camera module, share your working distance, the smallest detail you need to capture, the planned infrared wavelength, and a photo or drawing of the enclosure with Sinoseen. The engineering team can use those details to discuss lens and filter options. Contact Sinoseen to discuss your day/night imaging requirements
Table of Contents
- IR Focus Shift: Why Day and Night Images Focus Differently
- Why Can the Plane of Best Focus Shift After Dark?
- What Changes When a Camera Switches to Night Mode?
- Three Checks Before You Blame the Lens
- How to Keep Day and Night Images Sharp Enough
- A Sinoseen Module to Evaluate
- What to Record When Testing a Sample